


< Previous | Contents | Manuals Home | Boris FX | Next >
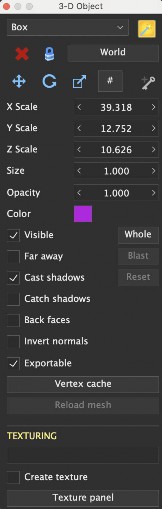
3-D Control Panel
Creation Mesh Type. Drop-down. Selects the type of object created by the Create Tool. Note that the Earthling is scaled so that 1.0 is the top of his head, not hand. If you want a 6ft tall earthling, set the scale to 6. You can add your custom meshes by putting a copy in the Custom Meshes folder in your personal File/User Data Folder or in the SynthEyes install (for all users). Export a .sbm copy of a mesh to avoid questions about vertex normals and for quickest processing of large custom meshes.
Create Tool. ![]() Mode button. Clicking in a 3-D viewport creates the mesh object listed on the creation mesh type list, such as a pyramid or Earthling. Most mesh objects require two drag sequences to set the position, size, and scale. Note that mesh objects are different than objects created with the Shot Menu’s Add Moving Object button. Moving objects can have trackers associated with them, but are themselves null objects. Mesh objects have a mesh, but no trackers. Often you will create a moving object and its trackers, then add a mesh object(s) to it after solving to check the track.
Mode button. Clicking in a 3-D viewport creates the mesh object listed on the creation mesh type list, such as a pyramid or Earthling. Most mesh objects require two drag sequences to set the position, size, and scale. Note that mesh objects are different than objects created with the Shot Menu’s Add Moving Object button. Moving objects can have trackers associated with them, but are themselves null objects. Mesh objects have a mesh, but no trackers. Often you will create a moving object and its trackers, then add a mesh object(s) to it after solving to check the track.
Delete. ![]() Button. Deletes the selected object.
Button. Deletes the selected object.
Lock Selection. ![]() Mode button. Locks the selection in the 3-D viewport to prevent inadvertent reselection when moving objects. This enables additional functionality to rotate or scale an object about any arbitrary point, inside or outside the object. Lock Selection turns off automatically when you exit the 3D panel, except if you had turned it on prior to opening the 3D Panel, using the right-click menu of the 3D or perspective viewports.
Mode button. Locks the selection in the 3-D viewport to prevent inadvertent reselection when moving objects. This enables additional functionality to rotate or scale an object about any arbitrary point, inside or outside the object. Lock Selection turns off automatically when you exit the 3D panel, except if you had turned it on prior to opening the 3D Panel, using the right-click menu of the 3D or perspective viewports.
![]()
World/Object. Mode button. Switches between the usual world coordinate system, and the object coordinate system where everything else is displayed relative to the current object or camera, as selected by the shot menu. Lets you add a mesh aligned to an object easily.
Move Tool. Mode button. Dragging an object in the 3-D viewport moves it.
Rotate Tool. Mode button. Dragging an object in the 3-D viewport rotates it about the axis coming up out of the screen.
Scale Tool. ![]() Mode button. Dragging an object in the 3-D viewport scales it uniformly. Use the spinners to change each axis individually.
Mode button. Dragging an object in the 3-D viewport scales it uniformly. Use the spinners to change each axis individually.
#. Mode button. The XYZ spinners switch to control the number of segments along width, depth, and height of the selected primitive object(s). Used to create higher or lower-resolution versions of builtin primitive meshes for editing and texture extraction.
Make/Remove Key. ![]() ,
, ![]() Button. Adds or removes a key at the current frame for the currently-selected object.
Button. Adds or removes a key at the current frame for the currently-selected object.
X/Y/Z Values. Spinners. Display X, Y, or Z position, rotation or scale values, depending on the currently-selected tool. Note that when a camera/moving object is selected, the pan/tilt/roll rotation angles can be animated outside the usual 360 degree range for rotation angles, and those angles will be preserved as-is. With a camera or moving object selected, right-clicking clears 1 key, shift-right truncates, control-right clears totally.
Size/Distance. Spinner. This is an overall size spinner, use it when the Scale Tool is selected to change all three axis scales in lockstep. Fancy feature: if you hold down the ALT/command key while changing this spinner, the mesh's (only) position will also be scaled along the line of sight from the camera, so that the overall visual size and position of the mesh in the image doesn't change. This is helpful after a Pinning operation, for example. Additional nifty feature: When
the Move Tool is active, this spinner shows the distance from camera to the selected entity (not just meshes). You can change the spinner to move the object closer or further from the camera (it does not change size with this tool!).
Opacity. Spinner 0-1. Controls the opacity of the mesh in the perspective view and the OpenGL version of the camera view (see the View menu and preferences to enable OpenGL camera view). Note that opacity rendering is an inexact surface-based approximation and, to allow interactive performance, is not equivalent to changing the object into a semitransparent 3-D aero-gel.
Object color. Color Swatch. Object color, click to change. Note that lights, meshes, and trackers have both a static color and possibly an animated illumination color (if the Set Illumination... script has been run). The swatch shows the illuminated color, if present, and the static color if not. To access the static color when an animated color is present, see the swatches in the Hierarchy View or Graph Editor.
Visible. Button. Show or hide the selected object (camera, object, mesh, light, flex, etc).
Whole. Button. When moving a solved object, normally it moves only for the current frame, allowing you to tweak particular frames. If you turn on Whole, moving the object moves the entire path, so you can adjust your coordinate system without using locks. For convenience, turning on Whole selects the active camera or object and turns on Lock Selection. Turning Whole off turns off Lock Selection. Whole turns off automatically when you exit the 3D panel, except if you had turned it on prior to opening the 3D Panel, using the right-click menu of the 3D or perspective viewports. If you use Whole to align your coordinate system, you should set up some locks so that the coordinate system will be re-established if you solve again (done automatically by Auto-place). Hint: Whole mode has some rules to decide whether or not to affect meshes. Turn on or off Whole affects meshes on the 3-D viewport and perspective window’s right-click menu. There's also a preference in the Meshes area to turn Whole affects meshes on or off at startup.
In SynthEyes 2026, the Whole button cycles between two modes: Whole and Scene. Whole mode applies transforms relative to the selected camera or object, matching the behavior of earlier versions of SynthEyes. Scene mode applies the transform to the entire scene at once, regardless of selection, including all cameras, moving objects, trackers, and meshes. This performs a one-time global scene transform; after the operation completes, the scene resumes normal behavior. Scene mode does not require any object to be selected. Mesh behavior continues to respect the existing “Whole affects meshes” setting. The current Whole mode (Whole or Scene) is indicated by the button state and cycles each time the Whole button is clicked.
Far away. Mode button. Mesh is very far from the camera; to pretend that, its translation is parented to the camera similar to Far trackers. Permits reasonable-sized meshes to be used for distant backdrops more easily. May not be transmitted to all export targets.
Blast. Button. Writes the entire solved history onto the object’s seed path, so it can be
used for path seeding mode.
Cast Shadows. (Mesh or Light selected) Object/Light should cast a shadow in the perspective window.
Reset. Button. Clears the object’s solved path, exposing the seed path.
Catch shadows. (Mesh) Object should catch shadows in the perspective window.
Back faces. Draw the both sides of faces, not only the front.
Invert normals. Make the mesh normals point the other way from their imported values.
Exportable. Checkbox. When set, the selected item (mesh, tracker, camera, object, light, flex) is marked to be exported. When cleared, it is not. (It is up to the exporter to decide whether or not to export any individual item.)
Vertex cache. Button. Opens the Vertex Cache Control Panel, allowing you to set up an .ABC (Alembic), .MCX (Maya), .MDD (Lightwave), or .PC2 (3ds max) vertex cache file for the selected mesh, ie allowing it to display stored vertex animation (including mesh animation exported from SynthEyes itself). From that panel you can set the coordinate axis mode and a frame number (timing) offset. This button is blue when a vertex cache file is present. (Note: don't delete a vertex cache file that is used by a SynthEyes scene—the files are large and are not embedded in the .sni file.)
Reload mesh. Reloads the selected mesh, if any. If the original file is no longer accessible, allows a new location to be selected.
(texture filename). Non-editable Text field. Shows the name of the texture displayed on, or computed for, this mesh.
Create Texture. Checkbox. When on, a texture will be computed for this mesh on demand (see the texture panel).
Texture Panel. Button. Brings up the texture control panel (also available from the Window menu).
©2026 Boris FX, Inc. — UNOFFICIAL — Converted from original PDF.